Every Machine Talking Directly to S3 Is a Mess Waiting to Happen
You’ve got five machines. Maybe a NAS, a VPS, two workstations, and whatever that mystery box in the corner is running. Each one backs up independently to your S3-compatible bucket. Seems fine, right?
It’s not fine.
Each client is managing its own repository index. When one of them runs maintenance, it doesn’t know the others exist. Your deduplication is siloed, that same 800MB Docker layer you shipped to three machines is stored three times. Pruning on one host can’t touch another’s orphaned content. And if you want to check “do I have a working backup of machine B,” you’re SSH-ing into machine B and hoping.
This is the “everyone has the keys to the filing cabinet” problem. It works until it doesn’t.
Kopia’s repository server changes the architecture entirely. One central process owns the repository. Clients authenticate to it and store snapshots through it. Deduplication happens globally across all your hosts. Maintenance runs once, centrally. Per-host access scoping means one misconfigured machine can’t torch everyone else’s data.
Let’s build it.
Why Not Just Use Restic REST Server?
Fair question. Restic’s REST server (restic/rest-server) is the incumbent here and it’s solid. Here’s the honest comparison:
| Feature | Kopia repo server | Restic REST server |
|---|---|---|
| Global deduplication | Yes, all clients share a pool | No, each “repo” is isolated |
| Multi-host single repo | Native | Requires one repo per host or shared repo with no isolation |
| Per-user access control | Yes (ACL-based, since 0.8) | Append-only mode only |
| Web UI | Included and actually decent | None (third-party only) |
| Maintenance | Centralized, schedulable | Per-client or manual |
| TLS | Self-signed cert generation built-in | Bring your own |
| Compression | Zstd/gzip/snappy, per-policy | None (client-side only) |
| CLI ergonomics | Richer but more flags | Simpler mental model |
Restic REST server’s append-only mode is a legitimate ransomware mitigation story. If that’s your primary concern, it’s worth the tradeoff of no global dedup. For home lab multi-host setups where you control the server, Kopia’s architecture wins on almost every axis.
Borg? Borg server is SSH-based and one-repo-per-client. Great tool, but it doesn’t share a deduplication pool across hosts. That’s the dealbreaker.
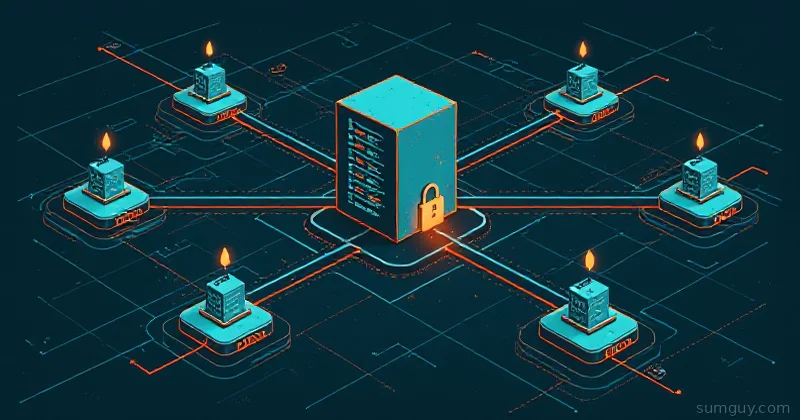
The Architecture in 90 Seconds
┌─────────────────────────────────────────────┐│ Kopia Repository Server ││ (Docker, your NAS, a VPS) ││ ││ ┌──────────────┐ ┌────────────────────┐ ││ │ HTTPS :51515 │ │ Backend: S3/B2/ │ ││ │ (TLS, auth) │ │ local disk/NFS │ ││ └──────────────┘ └────────────────────┘ │└──────────┬──────────────────────┬────────────┘ │ │ ┌──────▼──────┐ ┌──────▼──────┐ │ workstation │ │ NAS │ │ kopia client│ │ kopia client│ │ user: ws1 │ │ user: nas1 │ └─────────────┘ └─────────────┘The server holds the repository. Clients connect over HTTPS using their own credentials. Content is deduplicated globally, if two hosts back up the same file, it’s stored once. Each client only sees its own snapshots (with ACLs enabled). Maintenance, GC, repack, index rebuild, runs server-side on a schedule.
Setting Up the Server
Docker Compose
This is the fastest path. Create a directory, drop in a compose file, and you’re running in five minutes.
mkdir -p /opt/kopia-server/{config,cache,logs,repo}cd /opt/kopia-serverservices: kopia: image: kopia/kopia:latest container_name: kopia-server restart: unless-stopped ports: - "51515:51515" volumes: - ./config:/app/config - ./cache:/app/cache - ./logs:/app/logs - ./repo:/repository # local backend — swap for S3 env vars environment: - KOPIA_PASSWORD=your-repo-password-here - TZ=America/Chicago command: > server start --tls-generate-cert --address=0.0.0.0:51515 --server-control-user=admin --server-control-password=admin-control-password --htpasswd-file=/app/config/htpasswd --log-file=/app/logs/server.log user: "1000:1000"Generate the htpasswd file before starting. Kopia uses standard Apache-style htpasswd:
# Install htpasswd if you don't have it# Debian/Ubuntu: apt install apache2-utils# Arch: pacman -S apache
# Create the file and add usershtpasswd -c /opt/kopia-server/config/htpasswd workstation1htpasswd /opt/kopia-server/config/htpasswd nas1htpasswd /opt/kopia-server/config/htpasswd vps1
Start it:
docker compose up -ddocker compose logs -f kopiaYou should see something like:
SERVER: Listening on 0.0.0.0:51515SERVER: TLS certificate generated, fingerprint: SHA256:abc123...Grab that fingerprint. You’ll need it when connecting clients.
S3 Backend Instead of Local Disk
Replace the local volume with environment variables:
volumes: - ./config:/app/config - ./cache:/app/cache - ./logs:/app/logs # remove the ./repo:/repository volume environment: - KOPIA_PASSWORD=your-repo-password-here - AWS_ACCESS_KEY_ID=your-key-id - AWS_SECRET_ACCESS_KEY=your-secret-key - TZ=America/Chicago command: > server start --tls-generate-cert --address=0.0.0.0:51515 --server-control-user=admin --server-control-password=admin-control-password --htpasswd-file=/app/config/htpasswd --log-file=/app/logs/server.log --storage-type=s3 --storage-config='{"bucket":"your-bucket","endpoint":"s3.us-east-1.amazonaws.com","region":"us-east-1"}'For Backblaze B2 or other S3-compatible stores, adjust endpoint and region accordingly.
Initialize the Repository (First Time Only)
The server needs a repository to exist before clients can connect. Initialize it:
docker exec -it kopia-server kopia --config-file=/app/config/repository.config \ repo create filesystem \ --path=/repository \ --password=your-repo-password-hereFor S3:
docker exec -it kopia-server kopia --config-file=/app/config/repository.config \ repo create s3 \ --bucket=your-bucket \ --access-key-id=your-key-id \ --secret-access-key=your-secret-key \ --password=your-repo-password-hereConnecting Clients
On each machine you want to back up, install Kopia. On Debian/Ubuntu:
curl -s https://kopia.io/signing-key | gpg --dearmor -o /usr/share/keyrings/kopia-keyring.gpgecho "deb [signed-by=/usr/share/keyrings/kopia-keyring.gpg] https://packages.kopia.io/apt/ stable main" \ | tee /etc/apt/sources.list.d/kopia.listapt update && apt install kopiaConnect to the server. The --server-cert-fingerprint is the SHA256 value from server startup, this is your TLS pinning, no CA needed:
kopia repo connect server \ --url=https://kopia.example.com:51515 \ --server-cert-fingerprint=SHA256:abc123... \ --override-username=workstation1 \ --override-hostname=workstation1 \ --password=your-repo-password-hereThe --override-username must match the htpasswd entry. The --override-hostname is how Kopia scopes snapshots, set it explicitly so you control the label, not whatever hostname returns.
Verify the connection:
kopia repo statusYou should see the connected repository URL and your username. Run a quick snapshot to confirm:
kopia snapshot create /home/youruserkopia snapshot listBackup Policies: Globs, Exclusions, Schedules
Kopia’s policy system is per-path and inheritable. Set a global default, then override per-source.
# Global defaults — applies to everything without a specific policykopia policy set --global \  --compression=zstd-fastest \  --keep-latest=10 \  --keep-hourly=24 \  --keep-daily=14 \  --keep-weekly=8 \  --keep-monthly=12
# Specific path policy with exclusionskopia policy set /home/youruser \  --add-ignore=".cache" \  --add-ignore="node_modules" \  --add-ignore="*.tmp" \  --add-ignore=".local/share/Trash" \  --compression=zstd \  --scheduling-cron="0 2 * * *"
# Larger data, lighter compression, weekly schedulekopia policy set /var/lib/docker/volumes \  --compression=zstd-fastest \  --scheduling-cron="0 3 * * 0"
The --scheduling-cron field schedules the kopia snapshot create automatically when Kopia is running as a service. More on that in a moment.
Running as a Systemd Service (Client Side)
For the scheduled snapshots to fire, the Kopia client needs to run as a background service:
[Unit]Description=Kopia Backup ClientAfter=network-online.targetWants=network-online.target
[Service]Type=simpleUser=rootExecStart=/usr/bin/kopia server start \  --no-legacy-api \  --address=127.0.0.1:51616 \  --without-passwordRestart=on-failureRestartSec=10
[Install]WantedBy=multi-user.targetsystemctl daemon-reloadsystemctl enable --now kopia-clientSnapshots will now run per the cron expressions in your policies.
ACLs in Kopia: The War Story Setup
Here’s the scenario that burned me. I had three hosts sharing one repository. No ACLs configured. I was testing a policy change on my workstation and ran kopia snapshot delete --all to clear test snapshots. Except I’d accidentally connected with the wrong username override, and I deleted two weeks of NAS snapshots instead.
Nothing was lost permanently, the GC hadn’t run, but my heart rate disagreed with that statement for about ten minutes.
ACLs prevent this. Enable them on the server:
docker exec -it kopia-server kopia --config-file=/app/config/repository.config \ server acl enableNow define rules. By default, once ACLs are enabled, authenticated users only see their own content:
# Grant workstation1 read/write to its own snapshotsdocker exec -it kopia-server kopia --config-file=/app/config/repository.config \  server acl add \  --user=workstation1@workstation1 \  --access=FULL \  --target=type=snapshot,username=workstation1,hostname=workstation1
# Grant nas1 read/write to its own snapshotsdocker exec -it kopia-server kopia --config-file=/app/config/repository.config \  server acl add \  --user=nas1@nas1 \  --access=FULL \  --target=type=snapshot,username=nas1,hostname=nas1
# Grant admin full access to every snapshotdocker exec -it kopia-server kopia --config-file=/app/config/repository.config \  server acl add \  --user=admin@* \  --access=FULL \  --target=type=snapshot
# List current ACLsdocker exec -it kopia-server kopia --config-file=/app/config/repository.config \  server acl list
The user format is username@hostname, this is why --override-hostname matters when connecting clients. Wildcard the hostname with @* for users that should have cross-host access.
With ACLs in place, workstation1 literally cannot list, read, or delete snapshots belonging to nas1. The delete incident above becomes impossible.
Maintenance: GC, Repack, and Index Rebuild
This is where the centralized model pays dividends. You run maintenance once, server-side, and it covers all clients.
Kopia has two maintenance modes:
Quick maintenance, runs frequently, low overhead. Drops unreferenced index entries.
Full maintenance, periodic, heavier. Rewrites content packs, removes truly orphaned blobs, rebuilds indexes.
Configure the schedule:
docker exec -it kopia-server kopia --config-file=/app/config/repository.config \ maintenance set \ --enable-automatic \ --owner=admin@server \ --quick-cycle=1h \ --full-cycle=24hTrigger manually if you need to clean up now:
# Quick passdocker exec -it kopia-server kopia --config-file=/app/config/repository.config \  maintenance run --mode=quick
# Full pass (takes longer, be patient)docker exec -it kopia-server kopia --config-file=/app/config/repository.config \  maintenance run --mode=full
Check maintenance status and upcoming schedule:
docker exec -it kopia-server kopia --config-file=/app/config/repository.config \ maintenance infoThe Web UI: Actually Worth Using
Kopia ships a built-in web interface. Point a browser at https://kopia.example.com:51515 and log in with your server control credentials (not the htpasswd user credentials, the --server-control-user ones).
It’s not Grafana. But it’s genuinely useful for:
- Browsing snapshots by host without SSH-ing into each machine
- Checking repository stats (size, dedup ratio, content counts)
- Viewing and configuring policies visually
- Triggering manual snapshots and maintenance runs
- Browsing files within a snapshot before you restore
The dedup ratio display is satisfying. Seeing “storage used: 48GB, original data: 312GB” across five hosts is the kind of feedback that makes you feel good about your architecture choices.
Restoring Data
From the client side, restoring is straightforward:
# List snapshots for this hostkopia snapshot list /home/youruser
# Mount a snapshot for browsing (great for finding what you actually need)kopia mount k7e6a2f3... /mnt/restore &ls /mnt/restore/home/youruser/fusermount -u /mnt/restore
# Restore a specific snapshot to a directorykopia restore k7e6a2f3... /tmp/restore-target/
# Restore a single filekopia restore k7e6a2f3.../home/youruser/Documents/important.pdf /tmp/important.pdf
The mount approach is underrated. When someone says “I need yesterday’s version of that config file,” mounting and browsing is faster than guessing at paths and restore commands.
Compression Options Reference
Kopia’s compression is per-policy. Pick based on your hardware and data type:
| Algorithm | Speed | Ratio | Best for |
|---|---|---|---|
zstd-fastest | Very fast | Moderate | Databases, large files, cold storage |
zstd | Fast | Good | General use, recommended default |
zstd-better-compression | Slow | Best | Archive, infrequent writes |
gzip | Moderate | Good | Compatibility priority |
snappy | Fastest | Low | Already-compressed data, speed critical |
For home lab: zstd for most things, zstd-fastest for large binary blobs (Docker volumes, VM disks), and zstd-better-compression for cold archive paths you write once.
The Bottom Line
Raw S3 access per machine is fine for a single host. The moment you add a second machine, or the first time you want to check backup status without SSHing into each box, the architecture breaks down.
Kopia repository server gives you a single pane of glass over a shared deduplication pool, per-client credentials, ACL scoping that prevents one misconfigured host from trashing another’s snapshots, and centralized maintenance that actually runs.
The setup takes maybe 30 minutes. The Docker compose approach means you can run it on your NAS, a cheap VPS, or that always-on server you already have. The TLS cert generation is built in so you don’t need to mess with Let’s Encrypt for an internal service.
Your 2 AM self, the one who just realized they deleted the wrong directory and needs a restore path that actually works, will appreciate having done this properly.
Set it up once. Let it run. Stop thinking about it.